
| 일 | 월 | 화 | 수 | 목 | 금 | 토 |
|---|---|---|---|---|---|---|
| 1 | 2 | 3 | 4 | |||
| 5 | 6 | 7 | 8 | 9 | 10 | 11 |
| 12 | 13 | 14 | 15 | 16 | 17 | 18 |
| 19 | 20 | 21 | 22 | 23 | 24 | 25 |
| 26 | 27 | 28 | 29 | 30 |
Tags
- vscode
- Python
- ssh에러
- 머신러닝
- 쿠버네티스
- 도커설치
- Docker
- MaskRCNN
- dockercompose
- WSL오류
- 배깅
- vscode접속
- ray적용시키기
- python분산처리
- 부스팅
- k8s
- 오케스트레이션
- 앙상블기법
- ResNet
- 병렬처리
- 도커컴포즈
- 분산처리
- 도커
- 성능비교
- 0x80041001
- WSL에러
- remote-ssh
- mrccn
- kubernetes
- wsl2
Archives
- Today
- Total
아리곤듀의 개발 성장 일기
이상치 탐지 및 시각화 (코드 예제 포함) 본문
1. 이상 탐지(Anomaly detection)
이상 탐지(anomaly detection)란 자료에서 다른 패턴을 보이는 자료를 찾는 것을 말합니다. 이런 데이터를 이상값(anomaly)라 하며 이상 탐지는 사기 탐지, 침입 탐지, 안전 관리를 포함한 다양한 분야에 널리 활용된다.
2. 이상의 종류
2.1. Point anomaly
데이터셋 내에 하나의 데이터가 나머지에 대해 이상하다고 판단되는 경우, 흔히 아웃라이어(Outlier)라고 부른다.
2.2. Collective anomaly
데이터셋 내에 여러 데이터 포인트가 이상하다고 판단되는 경우
2.3. Contextual anomaly
전체적인 데이터셋의 맥락을 고려했을때 이상하다고 판단되는 경우
3. Isolation forest
Isolation forest는 기본적으로 데이터셋을 의사결정나무(Decision Tree) 형태로 표현해 정상값을 분리하기 위해서는 의사결정나무를 깊숙하게 타고 내려가야 하고, 반대로 이상값은 의사결정나무 상단부에서 분리할 수 있다는 것을 이용한다.
이 특성을 사용해 의사결정나무를 몇 회 타고 내려가야 분리되는가를 기준으로 정상과 이상을 분리한다.
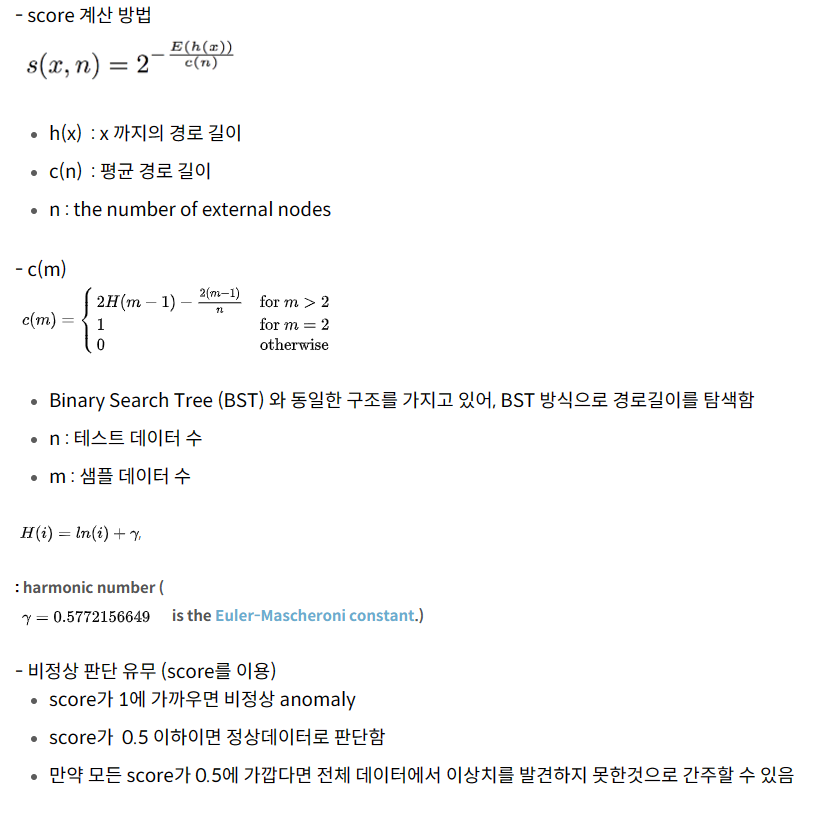
Isolation forest의 장점
- 군집기반 이상탐지 알고리즘에 비해 계산량이 매우 적다
- 강건한(Robust)한 모델을 만들 수 있다
# Isolation forest 구현 코드 예제
from sklearn.preprocessing import StandardScaler
from sklearn.ensemble import IsolationForest

df3 = df3.set_index('regdate-display') # 시간 컬럼 넣기
df3 = df3[['msg.base_state.curr-temperature']]  # 데이터 프레임의 원하는 컬럼 넣기

outliers_fraction = float(.01)
scaler = StandardScaler()
np_scaled = scaler.fit_transform(df3.values.reshape(-1, 1))
cast_scaled_df = pd.DataFrame(np_scaled)
model = IsolationForest(contamination=outliers_fraction)
model.fit(cast_scaled_df)
df3['anomaly'] = model.predict(cast_scaled_df)
위 예제는 한 컬럼의 이상치 탐지를 위한 코드이다. 먼저 standartscaler로 표준화 시킨 후 Isolation forest를 진행했다.
데이터셋의 값이 들쑥날쑥하거나, 매우 큰 경우에는 cost의 값이 발산하여 정상적인 학습이 이루어지지 않기 때문이다!

# 이상치 탐지 시각화 코드
#시각화
fig, ax = plt.subplots(figsize=(10,6))
a = df3.loc[df3['anomaly'] == -1, ['msg.base_state.curr-temperature']] #anomaly

bbox = dict( ## 텍스트 박스 스타일 지정
    boxstyle='square',
    facecolor='white',
)

line_plot = ax.plot(df3.index, df3['msg.base_state.curr-temperature'], color='black', label = 'Normal')
ax.scatter(a.index,a['msg.base_state.curr-temperature'], color='red', label = 'Anomaly')
line_plot = line_plot[0] # 선 그래프 요소

y = list(a['msg.base_state.curr-temperature'])
new_coord = []
for i in range(len(y)):
    for coord in list(line_plot.get_xydata()):
        if coord[1] == y[i]:
            new_coord.append([coord[0],y[i]])

for cor in new_coord:
    ax.text(cor[0],cor[1]+2,f'{int(cor[1])}',fontsize=12, ha='center', label = 'Anomaly', bbox=bbox)

ax.set_xlabel('time', fontsize = 14)
ax.set_ylabel('msg.base_state.curr-temperature', fontsize = 14)
ax.set_title("이상치 탐지 시각화", fontdict={'fontsize': 14} )
plt.show()
fig.savefig(output_path + 'CART_anomaly_detect.png')
결과 이미지는 아래와 같이 그래프에서 이상치가 어디에 있고 값은 어떤지 상위에 박스로 표시할 수 있도록 했다.

만약에 위 그래프를 그릴 때 한글이 깨진다면 아래 코드를 실행시키면 된다.
# 한글 폰트 깨짐 방지 코드
import matplotlib as mpl
import matplotlib.font_manager as fm

# print(mpl.matplotlib_fname()) # 디렉토리 확인하기

normal_font = fm.FontEntry(fname=os.path.join('{디렉토리 확인한 후 경로 넣기}', 'NanumGothic.otf'), name='NanumGothic')
fm.fontManager.ttflist.append(normal_font)
mpl.rcParams['font.family'] = normal_font.name


bold_font = fm.FontEntry(fname=os.path.join('/home/srjung/.local/lib/python3.10/site-packages/matplotlib/mpl-data/matplotlibrc', 'NanumBoldGothic.otf'), name='NanumBoldGothic')
fm.fontManager.ttflist.append(bold_font)

plt.rcParams['axes.unicode_minus'] = False
'Data Scientist > Machine Learning' 카테고리의 다른 글
| 모델 성능 평가 지표와 사용 목적 (0) | 2023.09.19 |
|---|---|
| [ML] 벡터의 개념 (0) | 2022.07.04 |
| [ML] 경사하강법 (0) | 2022.07.04 |
| [ML] XGBoost (0) | 2022.03.31 |
| [ML] 앙상블 기법 (0) | 2022.02.09 |
'Data Scientist/Machine Learning' Related Articles
more


